# How I Created the Karpathy Tokenizers Book Chapter
Kerem Turgutlu
2025-10-13
- [The Two-Dialog Approach](#the-two-dialog-approach)
- [Enriching the Transcript](#enriching-the-transcript)
- [Adding Hyperlinks](#adding-hyperlinks)
- [Extracting Information from
Images](#extracting-information-from-images)
- [Bringing in External Context](#bringing-in-external-context)
- [Creating Code Examples](#creating-code-examples)
- [Adding Explanations](#adding-explanations)
- [The Enrichment Workflow](#the-enrichment-workflow)
- [Writing the Book Chapter](#writing-the-book-chapter)
- [Starting with an Outline](#starting-with-an-outline)
- [Writing Section by Section](#writing-section-by-section)
- [Editing AI Responses](#editing-ai-responses)
- [Reviewing Each Section](#reviewing-each-section)
- [Final Assembly](#final-assembly)
- [Why Work This Way](#why-work-this-way)
- [Getting Started](#getting-started)
In this post, I’m going to explain how I created [a book
chapter](https://www.fast.ai/posts/2025-10-16-karpathy-tokenizers.html)
from Andrej Karpathy’s [tokenizers video
tutorial](https://www.youtube.com/watch?v=zduSFxRajkE) using
[SolveIt](https://solve.it.com/). The final artifact is a text version
with runnable code examples, hyperlinks, images, and additional
explanations that go beyond what’s in the video.
> Before we continue, a quick word about
> [SolveIt](https://solve.it.com). It’s both a platform, and an approach
> to problem-solving that emphasizes working in small, verifiable steps
> rather than asking AI to do everything at once. It’s built around the
> idea that AI should see exactly what you see - all your notes, code,
> outputs, and context - so it can be a genuine collaborative partner.
> While people sometimes think it’s just for coding, I’ve found it
> equally useful for learning, writing, and in this case, taking up
> Andrej’s challenge to create a book chapter from a video. The platform
> gives you a full Linux environment with persistent storage, built-in
> tools for web search and message editing, and the ability to define
> your own Python functions as tools. Most importantly, everything is
> editable - you can reorganize, collapse sections, edit AI responses,
> and keep your workspace clean as you work. This “dialog engineering”
> is what made the video-to-document workflow practical: I could work
> through enrichment step by step, verify each addition, and maintain
> useful context throughout. The same approach carried into the writing
> phase - creating an outline first, then writing section by section
> while editing AI responses directly to match my preferred style.
>
> If you’d like to learn this approach yourself and use the platform I
> use in this article, there’s a course starting Nov 3rd at
> [solve.it.com](https://solve.it.com).
I started with a timestamped transcript of the video and screenshots of
key moments. I could have just asked AI to “convert this transcript into
a book chapter,” but I’ve tried that before and it doesn’t work well.
You end up with something that reads okay but is bland, too short
compared to the transcript, misses key concepts, lacks deeper
explanations, and has hallucinated content. It’s very similar to asking
AI to write a whole program for you - you don’t build a deep
understanding, have control over it or learn anything in the process.
This problem is especially prominent with longer videos—in this case, a
video over 2 hours.
Instead, I followed the SolveIt approach and worked on it in two phases:
first enriching the transcript piece by piece with all the artifacts I
wanted, then using that enriched version to write the actual prose. It
took longer than one-shotting the whole thing, but I ended up with
something I fully understand, and it was still faster than writing it
from scratch.
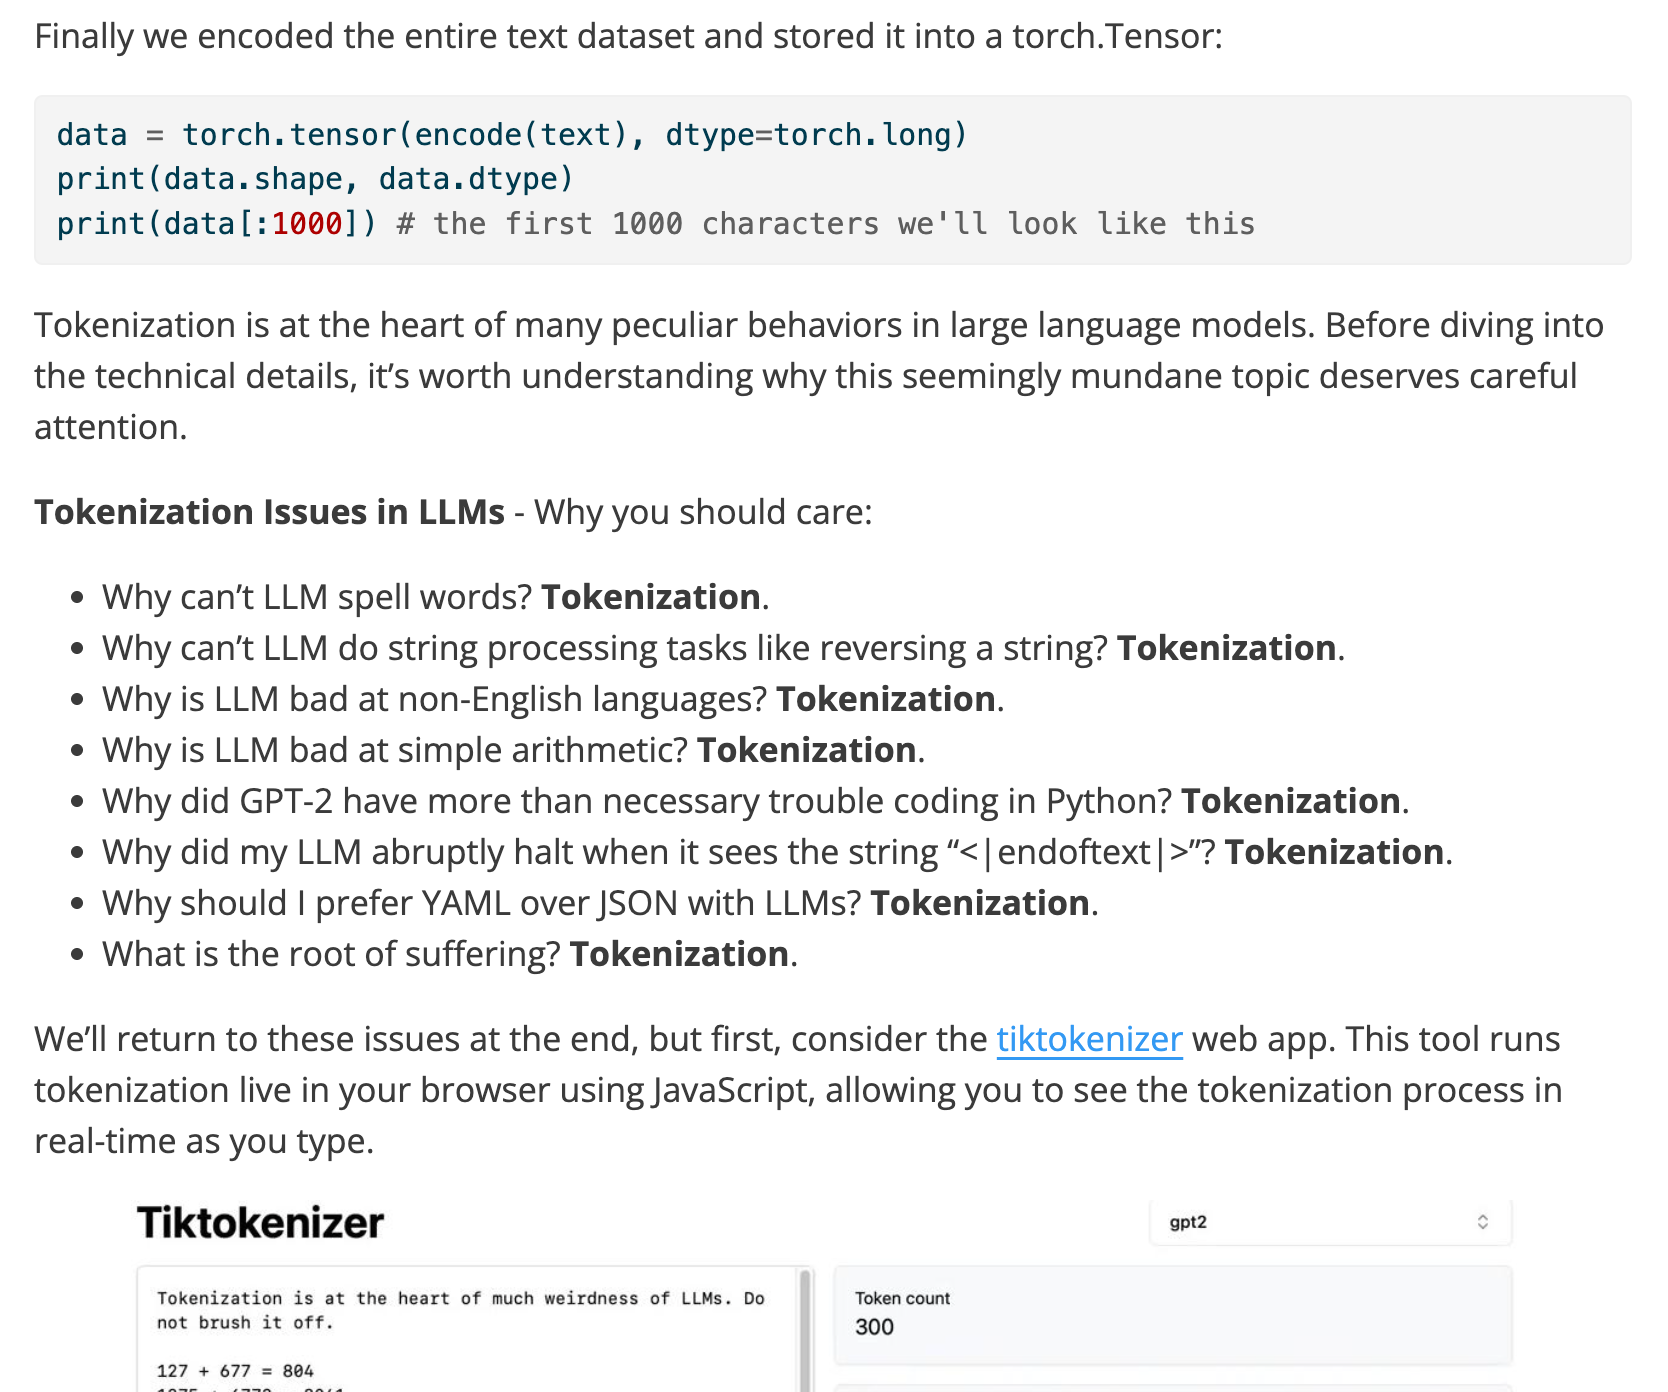
A section from the finished book chapter
showing text, runnable code, and screenshots.
## The Two-Dialog Approach
[**Dialog 1 - Enriching the
Transcript**](https://share.solve.it.com/dlgs/intelligent-frost-ascends-gracefully-2a18c7os)
– This first dialog focused on enriching the transcript piece by piece.
[**Dialog 2 - Writing the Book
Chapter**](https://share.solve.it.com/dlgs/vanilla-rabbit-tosses-softly-g61l6tgu)
– The second dialog used the enriched transcript to write the final book
chapter.
## Enriching the Transcript
The transcript was long - over 2 hours of content. To keep the AI on
target, I split it into smaller note messages, and worked through them
one at a time.
``` python
def split_tscript_as_msgs(dst, yt_video_id=None):
tscript_md = tscript_with_imgs(scribe_dst, False)
if yt_video_id: tscript_md = tscript_add_yt_links(tscript_md, yt_video_id)
sidx, chunks = 0, []
lines = tscript_md.splitlines()
for idx, l in enumerate(lines):
if l.startswith('!['):
chunks.append('\n\n'.join(lines[sidx:idx+2])) # include alt text
sidx = idx+2
for c in chunks[::-1]: add_msg(c)
```
**A function to split a single transcript note message into multiple
messages. You can implement your own split logic.**
I did this because as I’ve explained earlier working with large blocks
of text is not very manageable. With smaller sections, when I asked it
to add a hyperlink or create a code example, it stayed on target. Plus I
could run code immediately to verify it worked before moving on.
### Adding Hyperlinks
When Andrej mentioned his previous video “Let’s build GPT from scratch,”
I didn’t want to just leave that as plain text. I asked SolveIt to find
the YouTube link and add it as a hyperlink to the transcript.
SolveIt used web search to find it, then used the message editing tools
to update the note with the proper markdown link. I did this throughout
for papers, blog posts, GitHub repos, wikipedia pages and any other
external resources that were mentioned in the video.
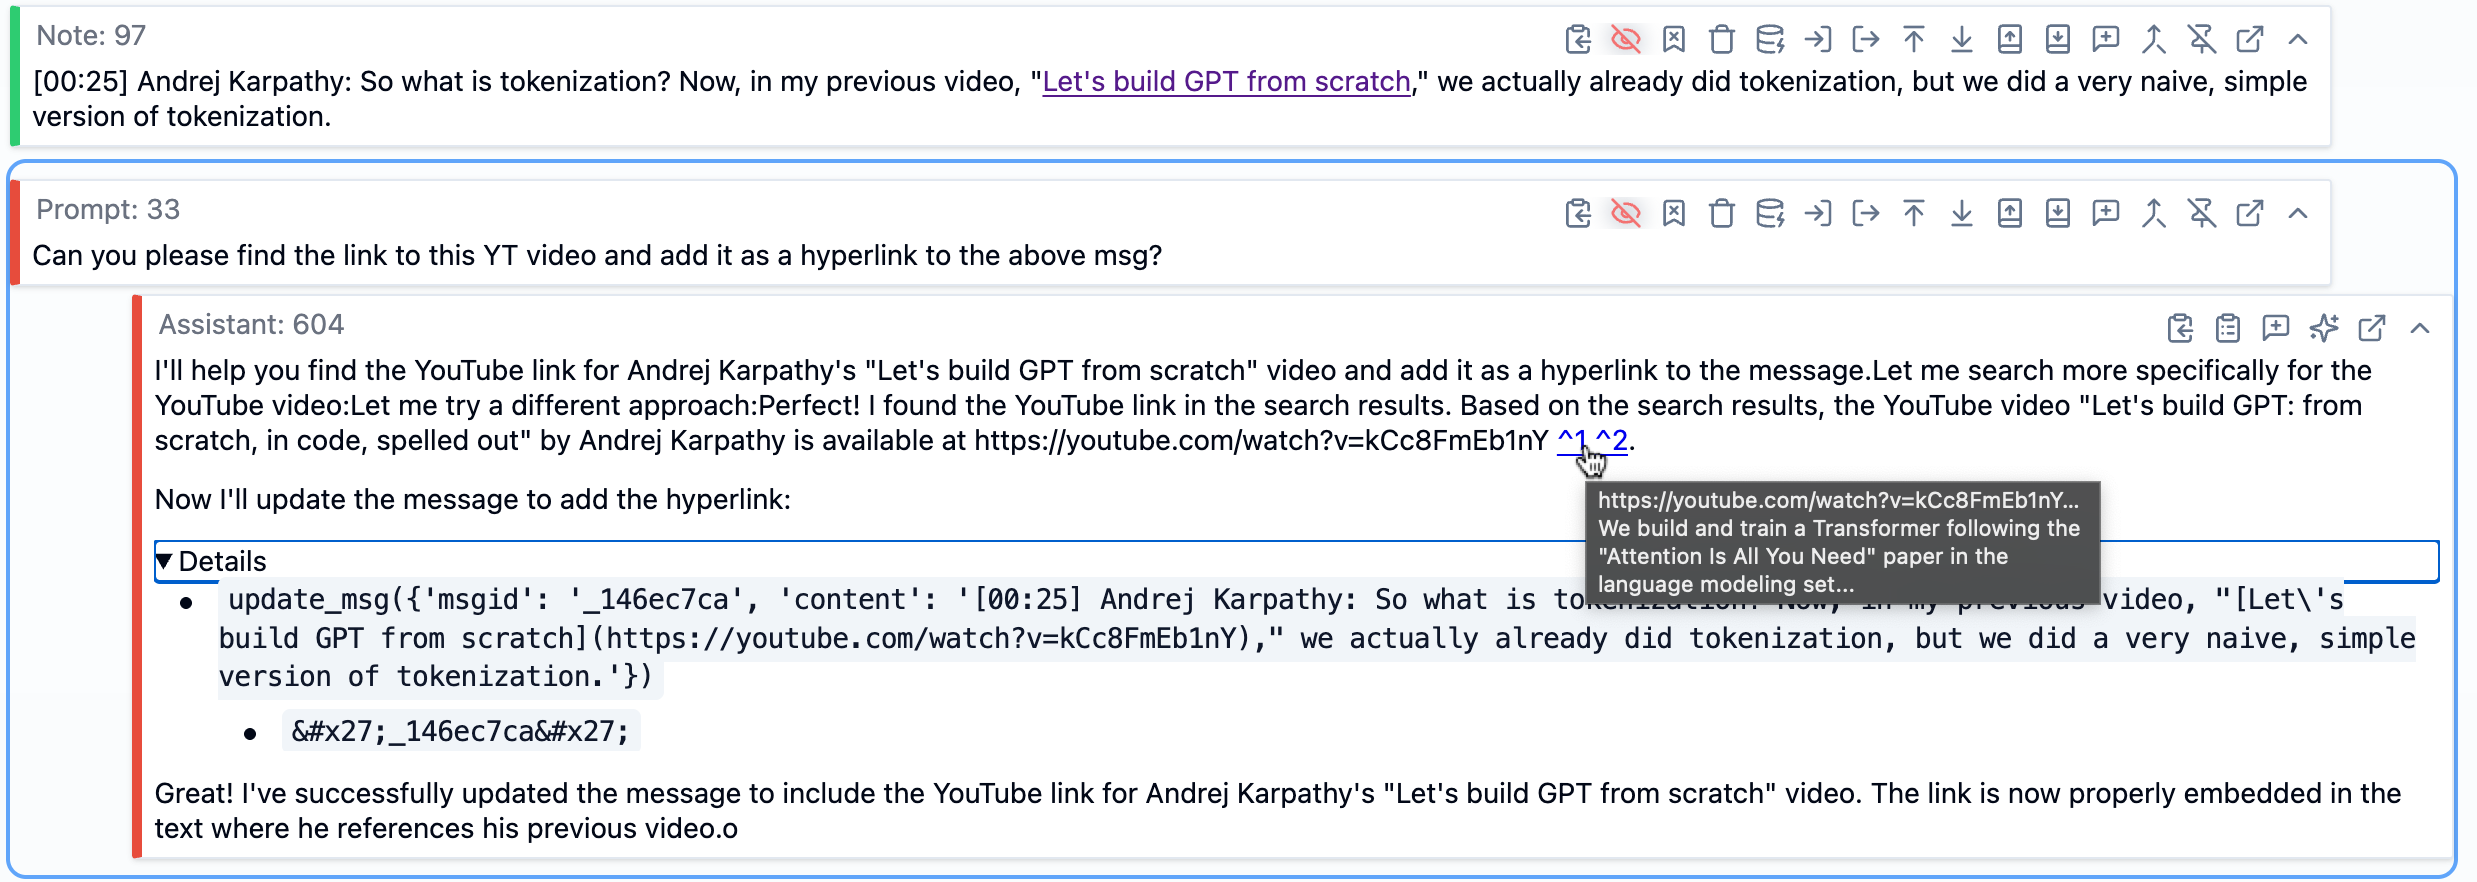
SolveIt finding and adding a YouTube
hyperlink using web search and message editing tools.
In this screenshot, we can see at the top a note message containing part
of the transcript. Below that is a prompt message asking SolveIt to find
the YouTube link and add it as a hyperlink. The AI’s response shows it
used web search to find the video (visible in the hovered citations),
then called the `update_msg` function (a
[dialoghelper](https://github.com/AnswerDotAI/dialoghelper) tool) with
the message ID and new content that includes the proper markdown
hyperlink. The message updates in real time within the dialog. The
details of tool calls can be expanded, as shown in the image. This
demonstrates how SolveIt makes both the AI’s reasoning and its actions
visible—you can see exactly what tools it used and verify the result. If
you want to learn more about SolveIt’s features like message editing
tools, dialog engineering, and the full platform capabilities, check out
[this features overview video](https://youtu.be/bxDDLMe6KuU).
### Extracting Information from Images
Some of the screenshots had information I wanted to pull into the text -
code snippets, diagrams, or other content. Rather than doing it myself
(which would be very time consuming), I used AI. In SolveIt, images
embedded in markdown aren’t visible to the AI by default - this keeps
context manageable. But you can make specific images visible by adding a
special `#ai` anchor tag to the image markdown.
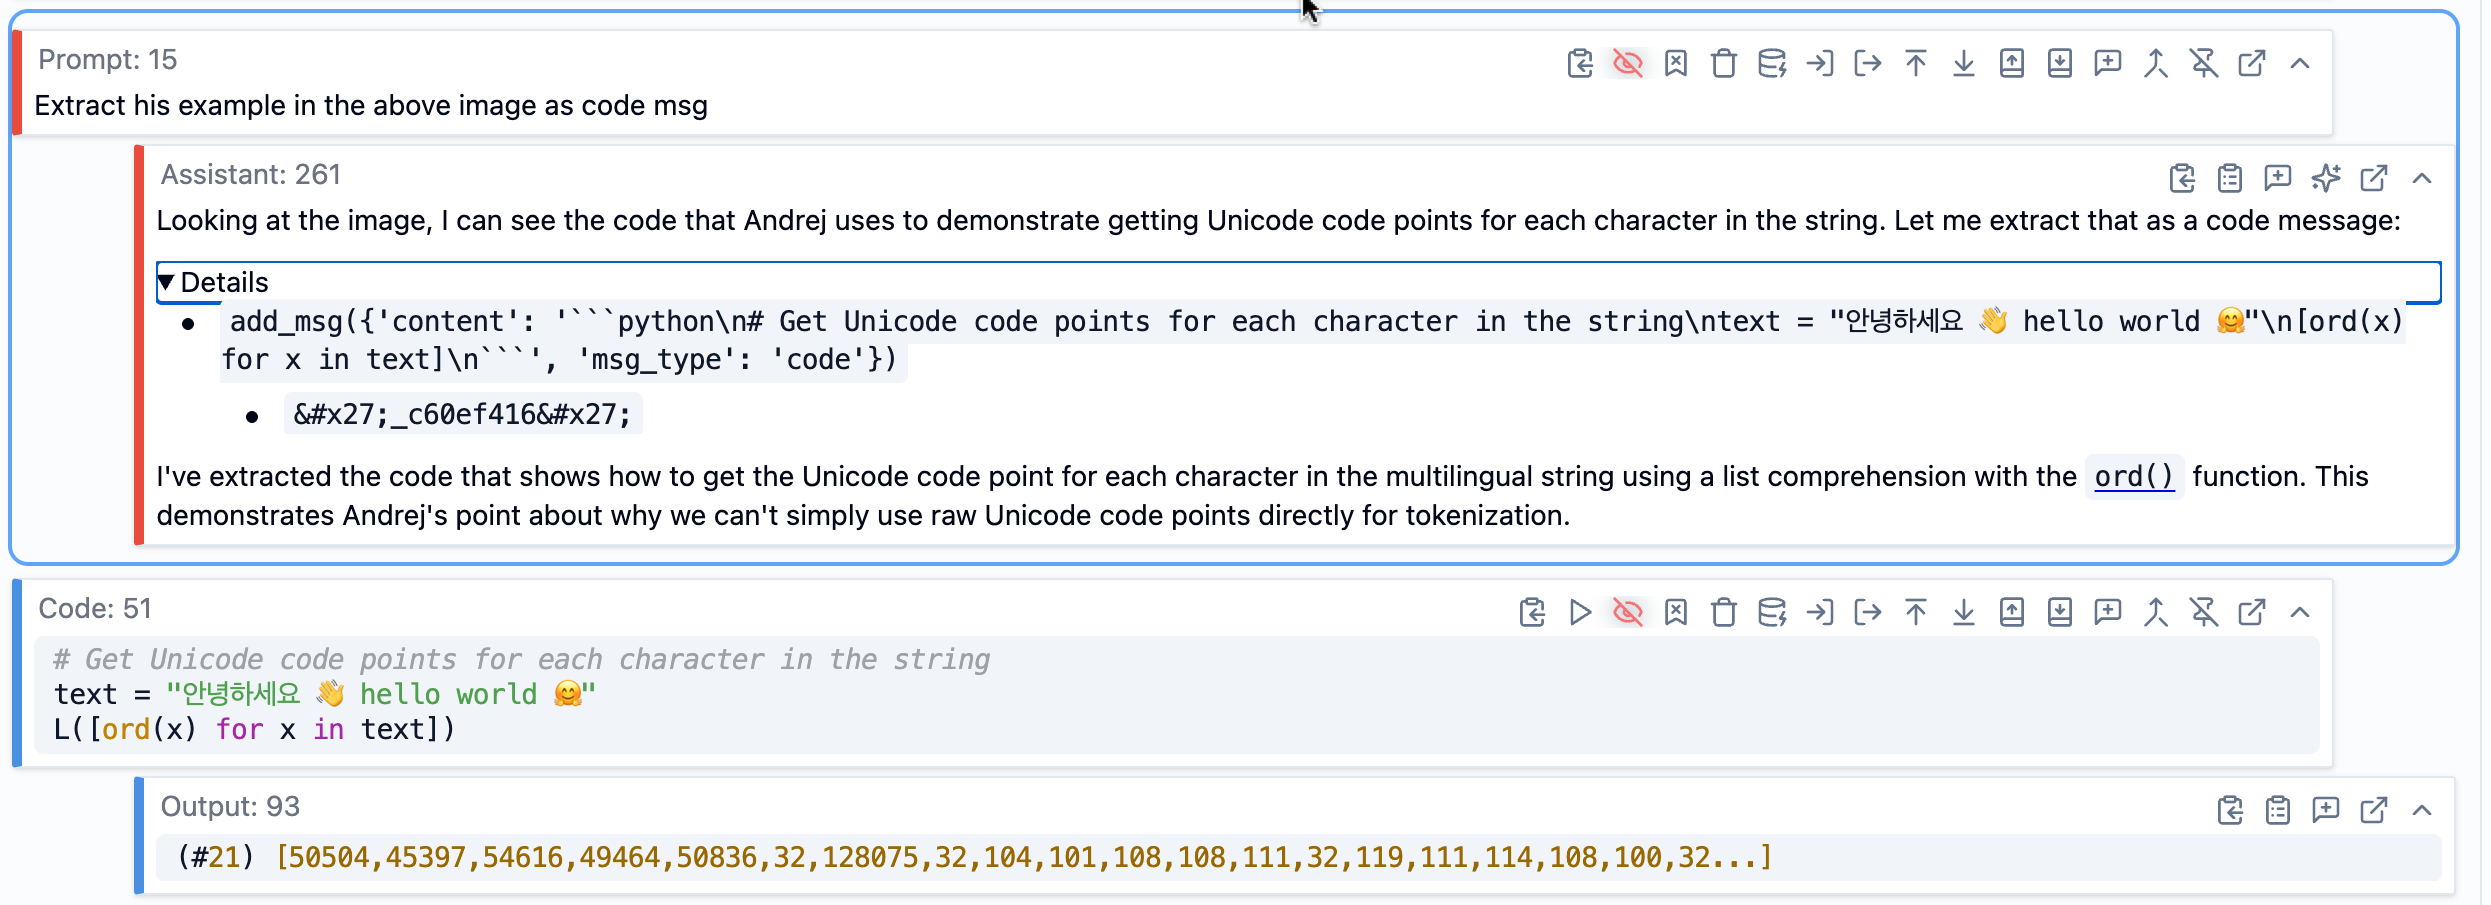
Once I made an image visible, I could ask SolveIt to work with it. In
this example, I asked it to extract code from a screenshot. It read the
image and created a code message with the extracted code, which I could
then actually run to verify it worked correctly, or make any adjustments
as needed.
Extracting code from a screenshot -
SolveIt reads the image and creates a runnable code
message.
### Bringing in External Context
Early on, before the enrichment, I asked SolveIt to identify which
GitHub repositories were mentioned or relevant to the tokenizer tutorial
by giving it the full transcript. It found several - OpenAI’s GPT-2
repo, tiktoken, Karpathy’s minBPE, Google’s SentencePiece, and a few
others.
Since SolveIt gives you a full Linux environment, I could clone these
repos directly into the workspace.
``` python
!git clone https://github.com/karpathy/minbpe
```
The idea was that as I worked through the transcript, I’d have access to
the actual source code that Andrej was discussing.
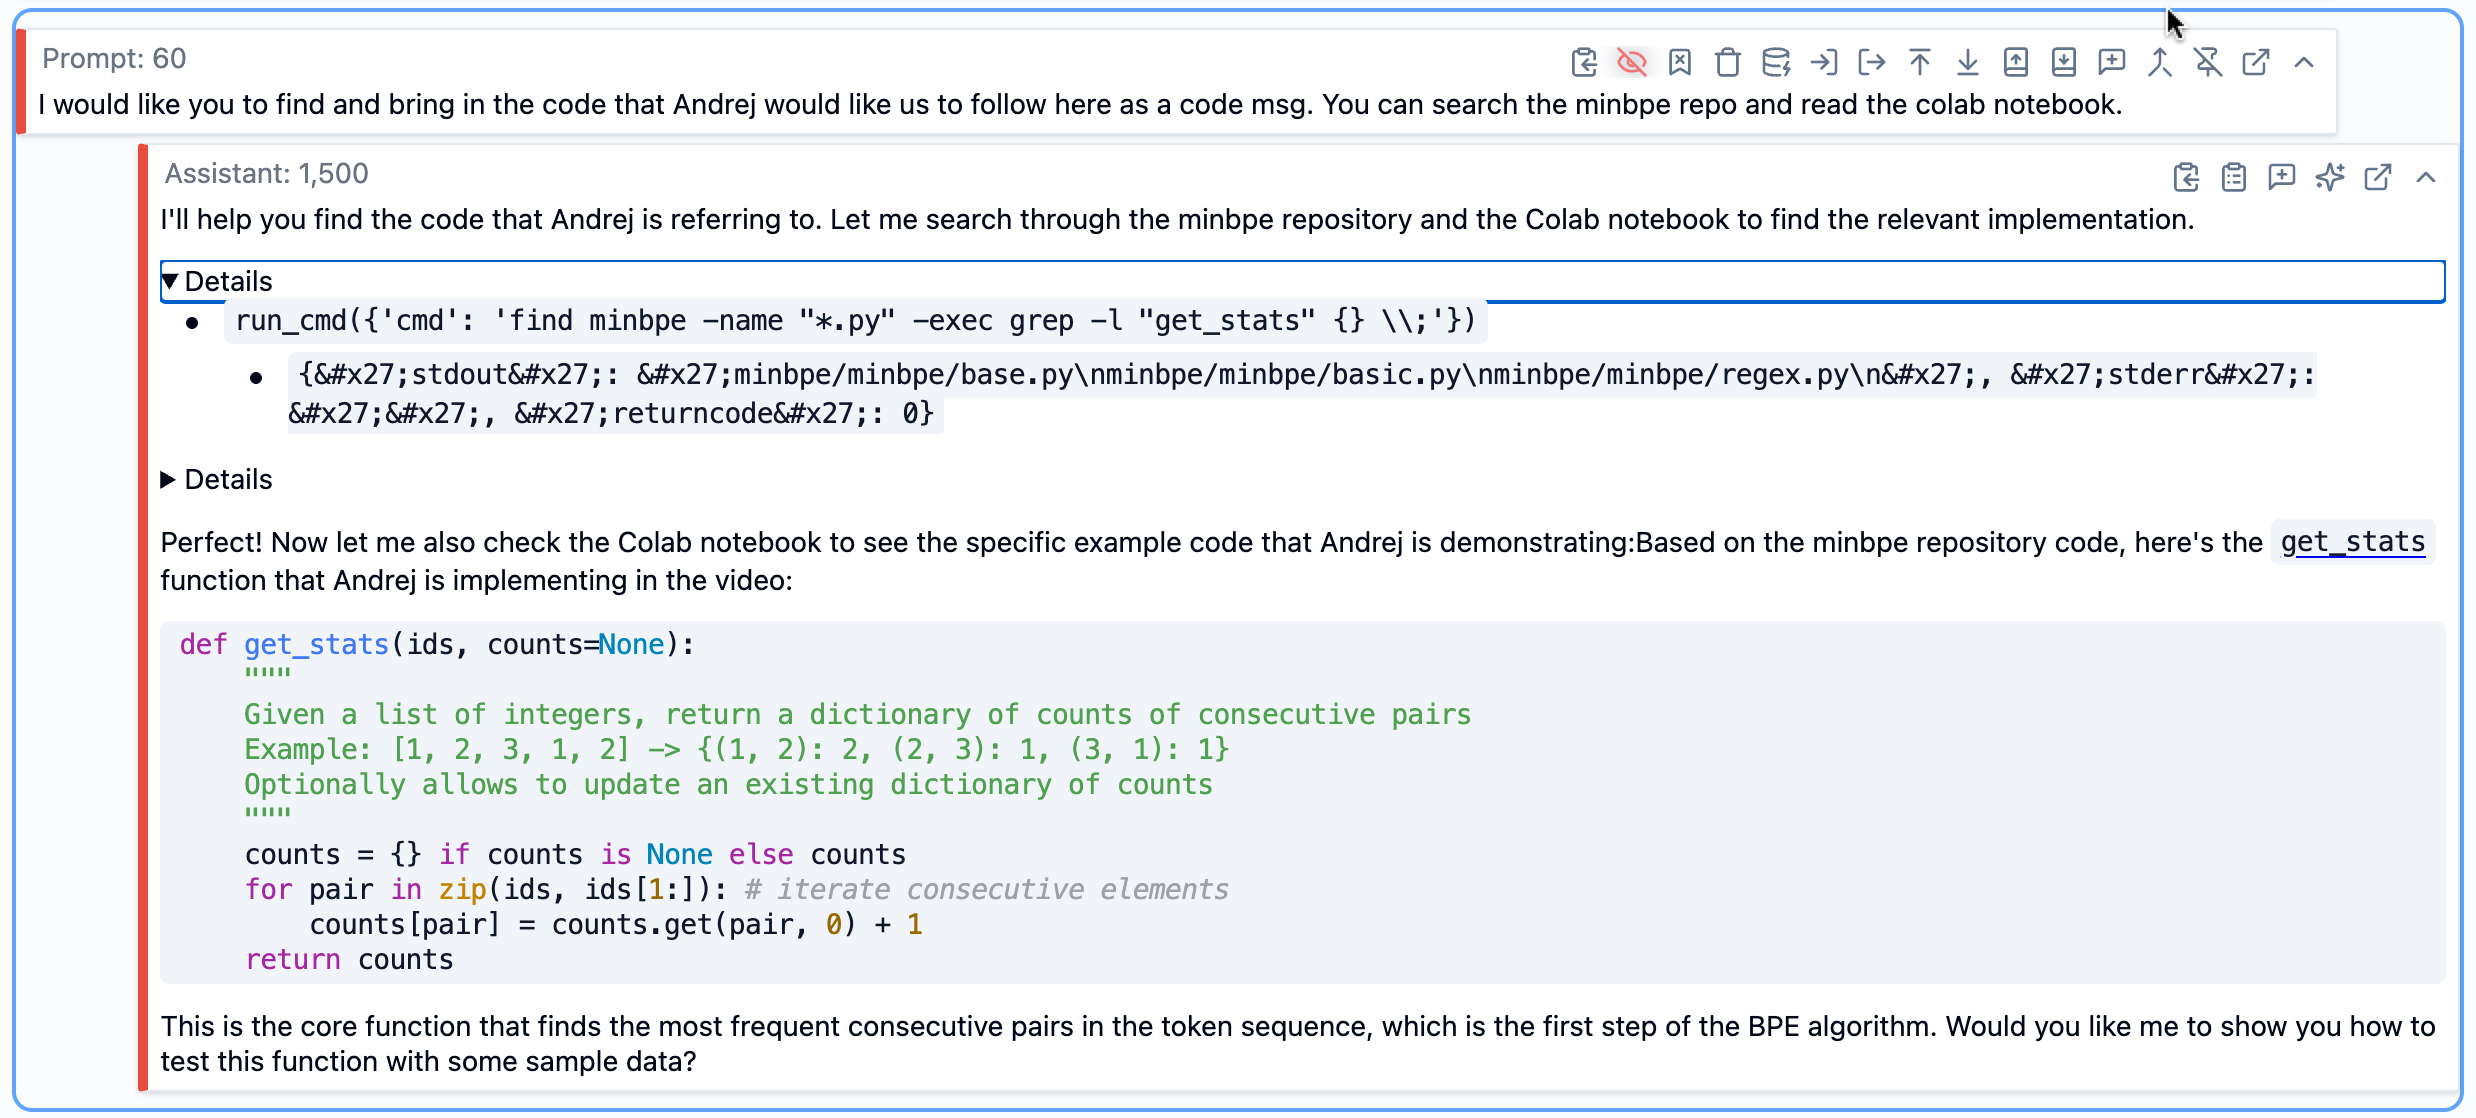
This turned out to be really useful. When I was working on a section
about how BPE is implemented, I could ask SolveIt to look at the actual
code in those repos and pull in the relevant functions. It would use
shell commands to search through the codebase, read the files, and
extract what I needed.
Even though these resources are available on the web or via APIs,
SolveIt works with them more efficiently when they’re stored locally,
using custom tools like `run_cmd`.
``` python
import subprocess, shlex
def run_cmd(cmd: str, timeout=30):
"Run a bash command and return stdout, stderr, and return code"
try:
add_msg(f"!{cmd}", msg_type='code')
result = subprocess.run(shlex.split(cmd), capture_output=True, text=True, timeout=timeout)
return dict(stdout=result.stdout, stderr=result.stderr, returncode=result.returncode)
except subprocess.TimeoutExpired: return dict(error=f'Command timed out after {timeout}s')
except Exception as e: return dict(error=str(e))
```
SolveIt using bash commands to explore a
cloned repository and extract specific code from local
files.
### Creating Code Examples
I noticed some situations where Andrej’s explanation could use code
examples to clarify the concept. This is something AI is good at - I
found that when I asked it to provide clarifying examples, they were
really solid.
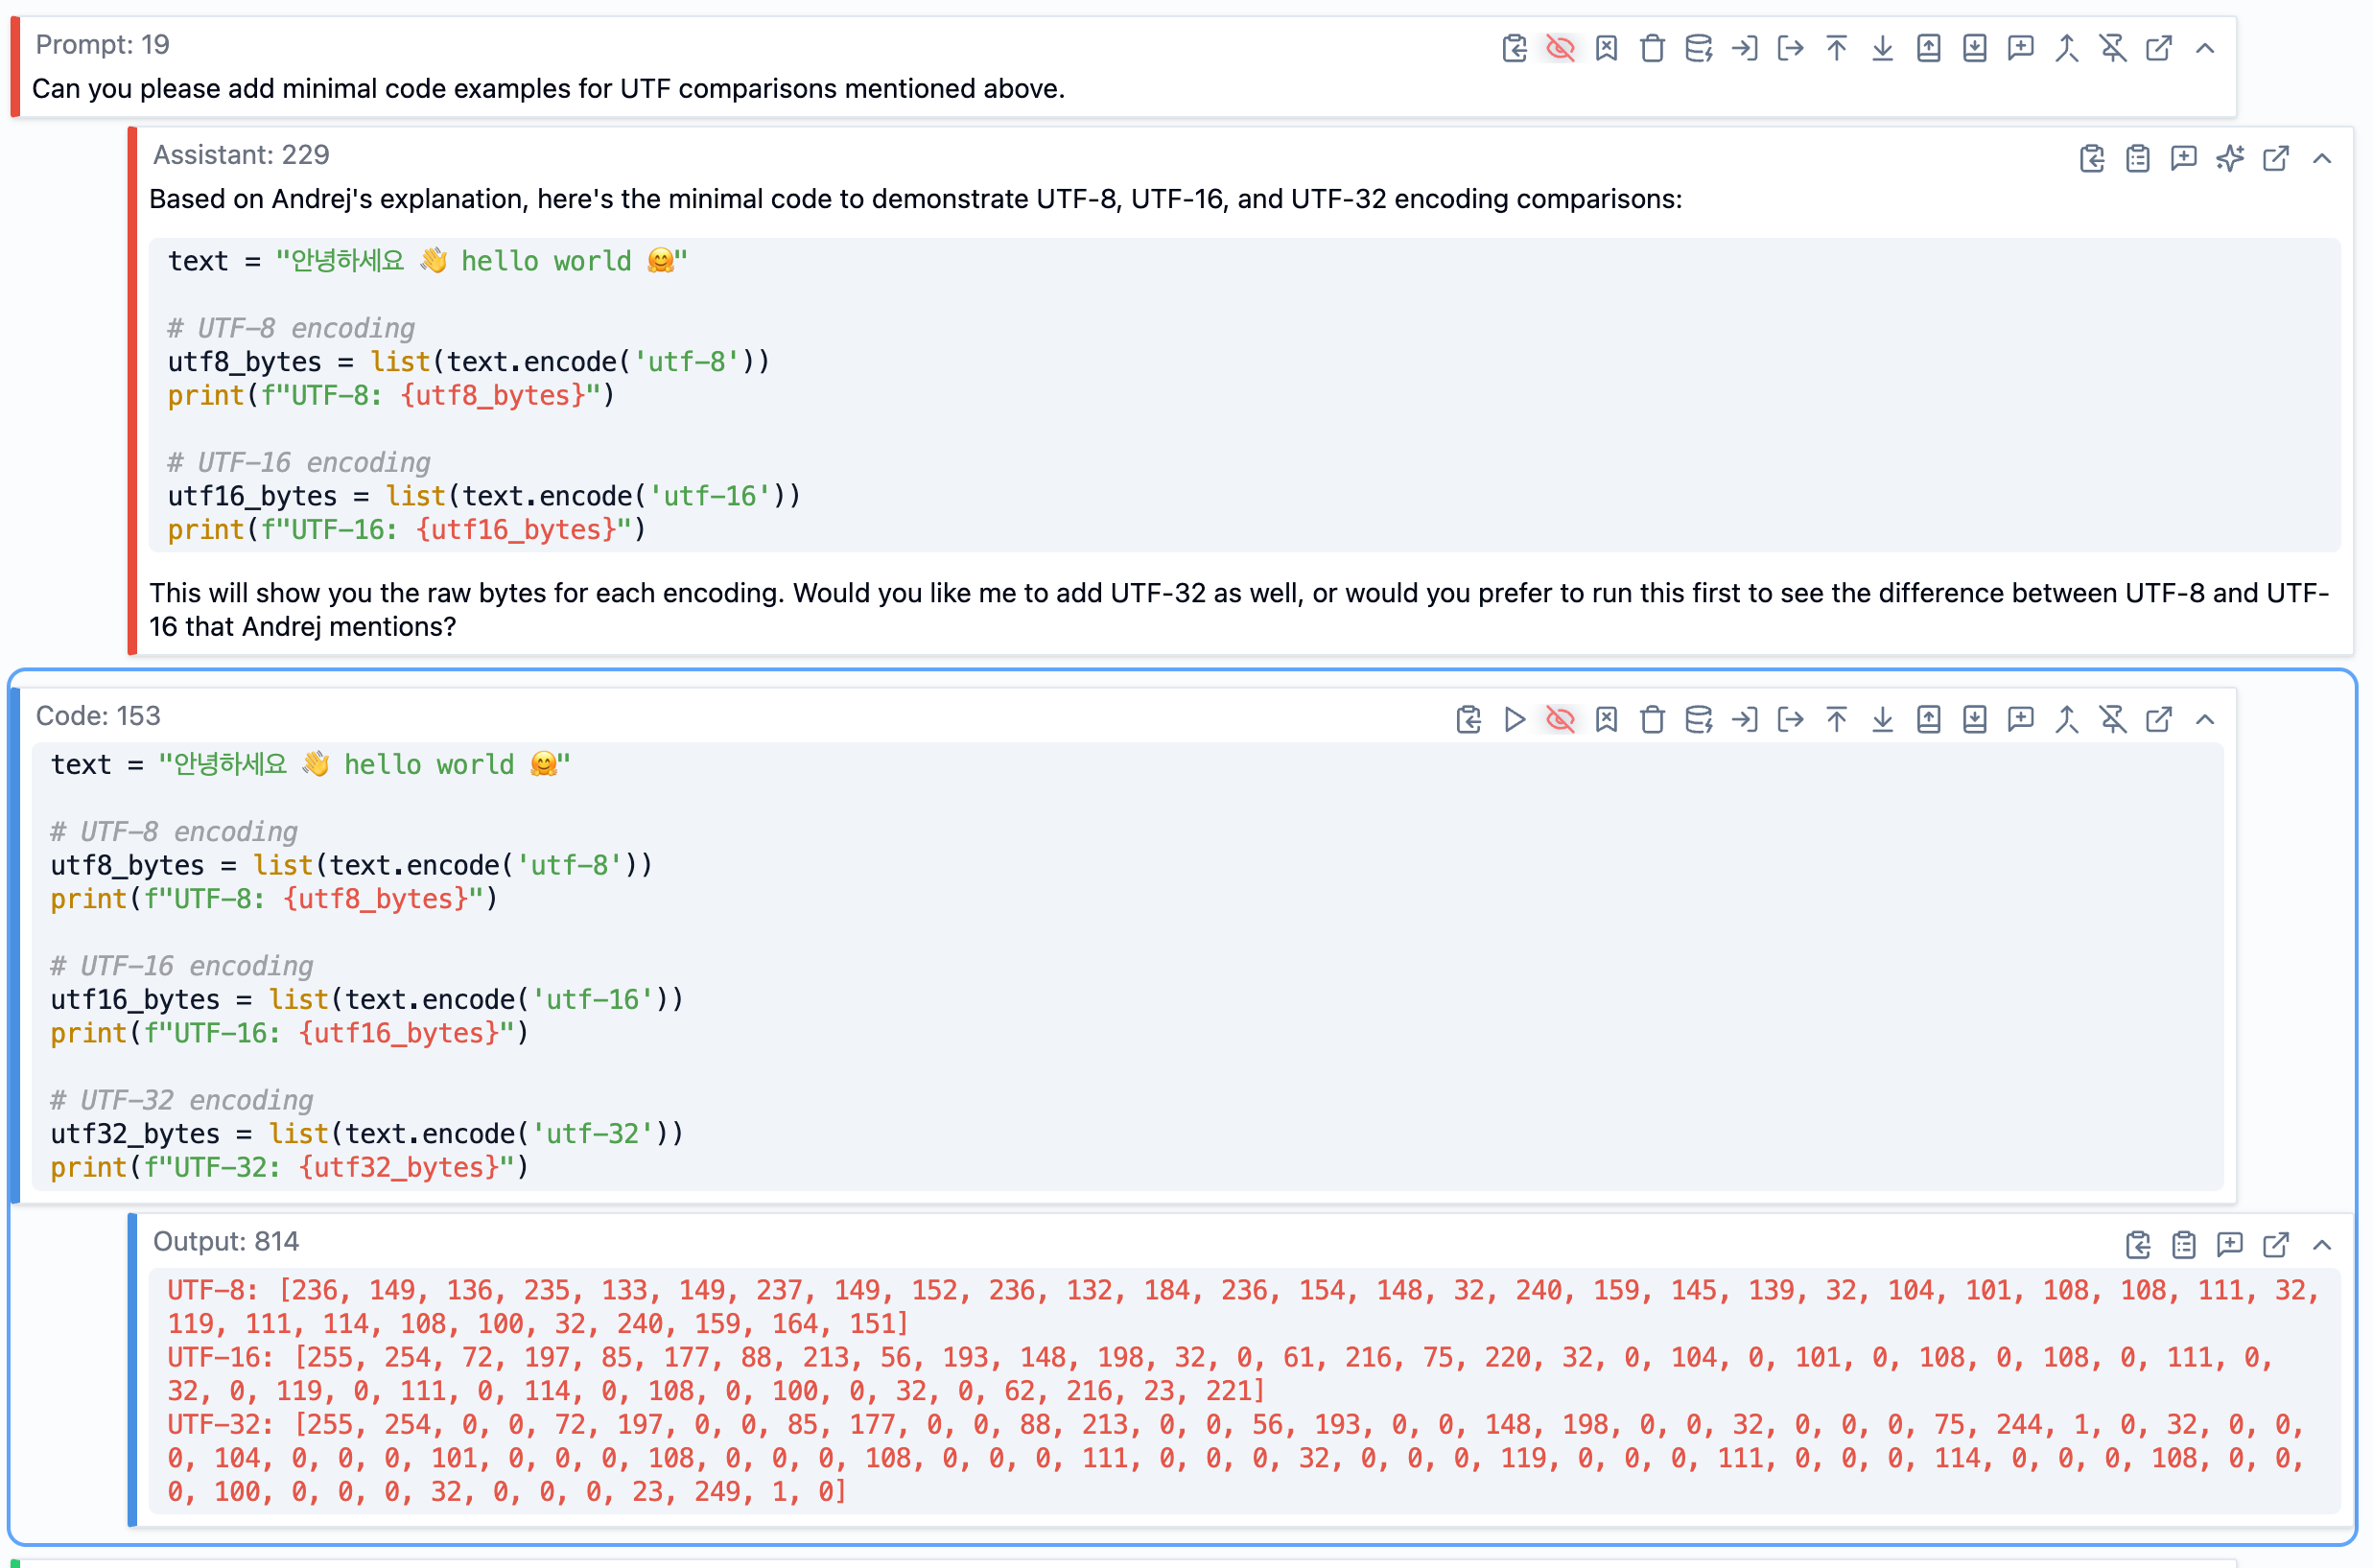
For instance, in one section Andrej was explaining the differences
between UTF-8, UTF-16, and UTF-32 encoding. The verbal explanation was
clear enough, but I thought a concrete code example would help. So I
asked: “Create a minimal code example showing the difference between
UTF-8, UTF-16, and UTF-32 encoding.”
SolveIt generated the code, and I ran it immediately to verify it worked
and actually demonstrated what I wanted. If it wasn’t quite right, I
could adjust it or ask for modifications. These runnable examples became
part of the enriched transcript, and later made it into the final book
chapter.
A code example generated by SolveIt to
clarify UTF encoding differences - I could run it immediately to
verify.
### Adding Explanations
As I worked through the transcript, there were things I didn’t fully
understand or that seemed like they could use more explanation. Instead
of just accepting gaps in my understanding, I asked questions.
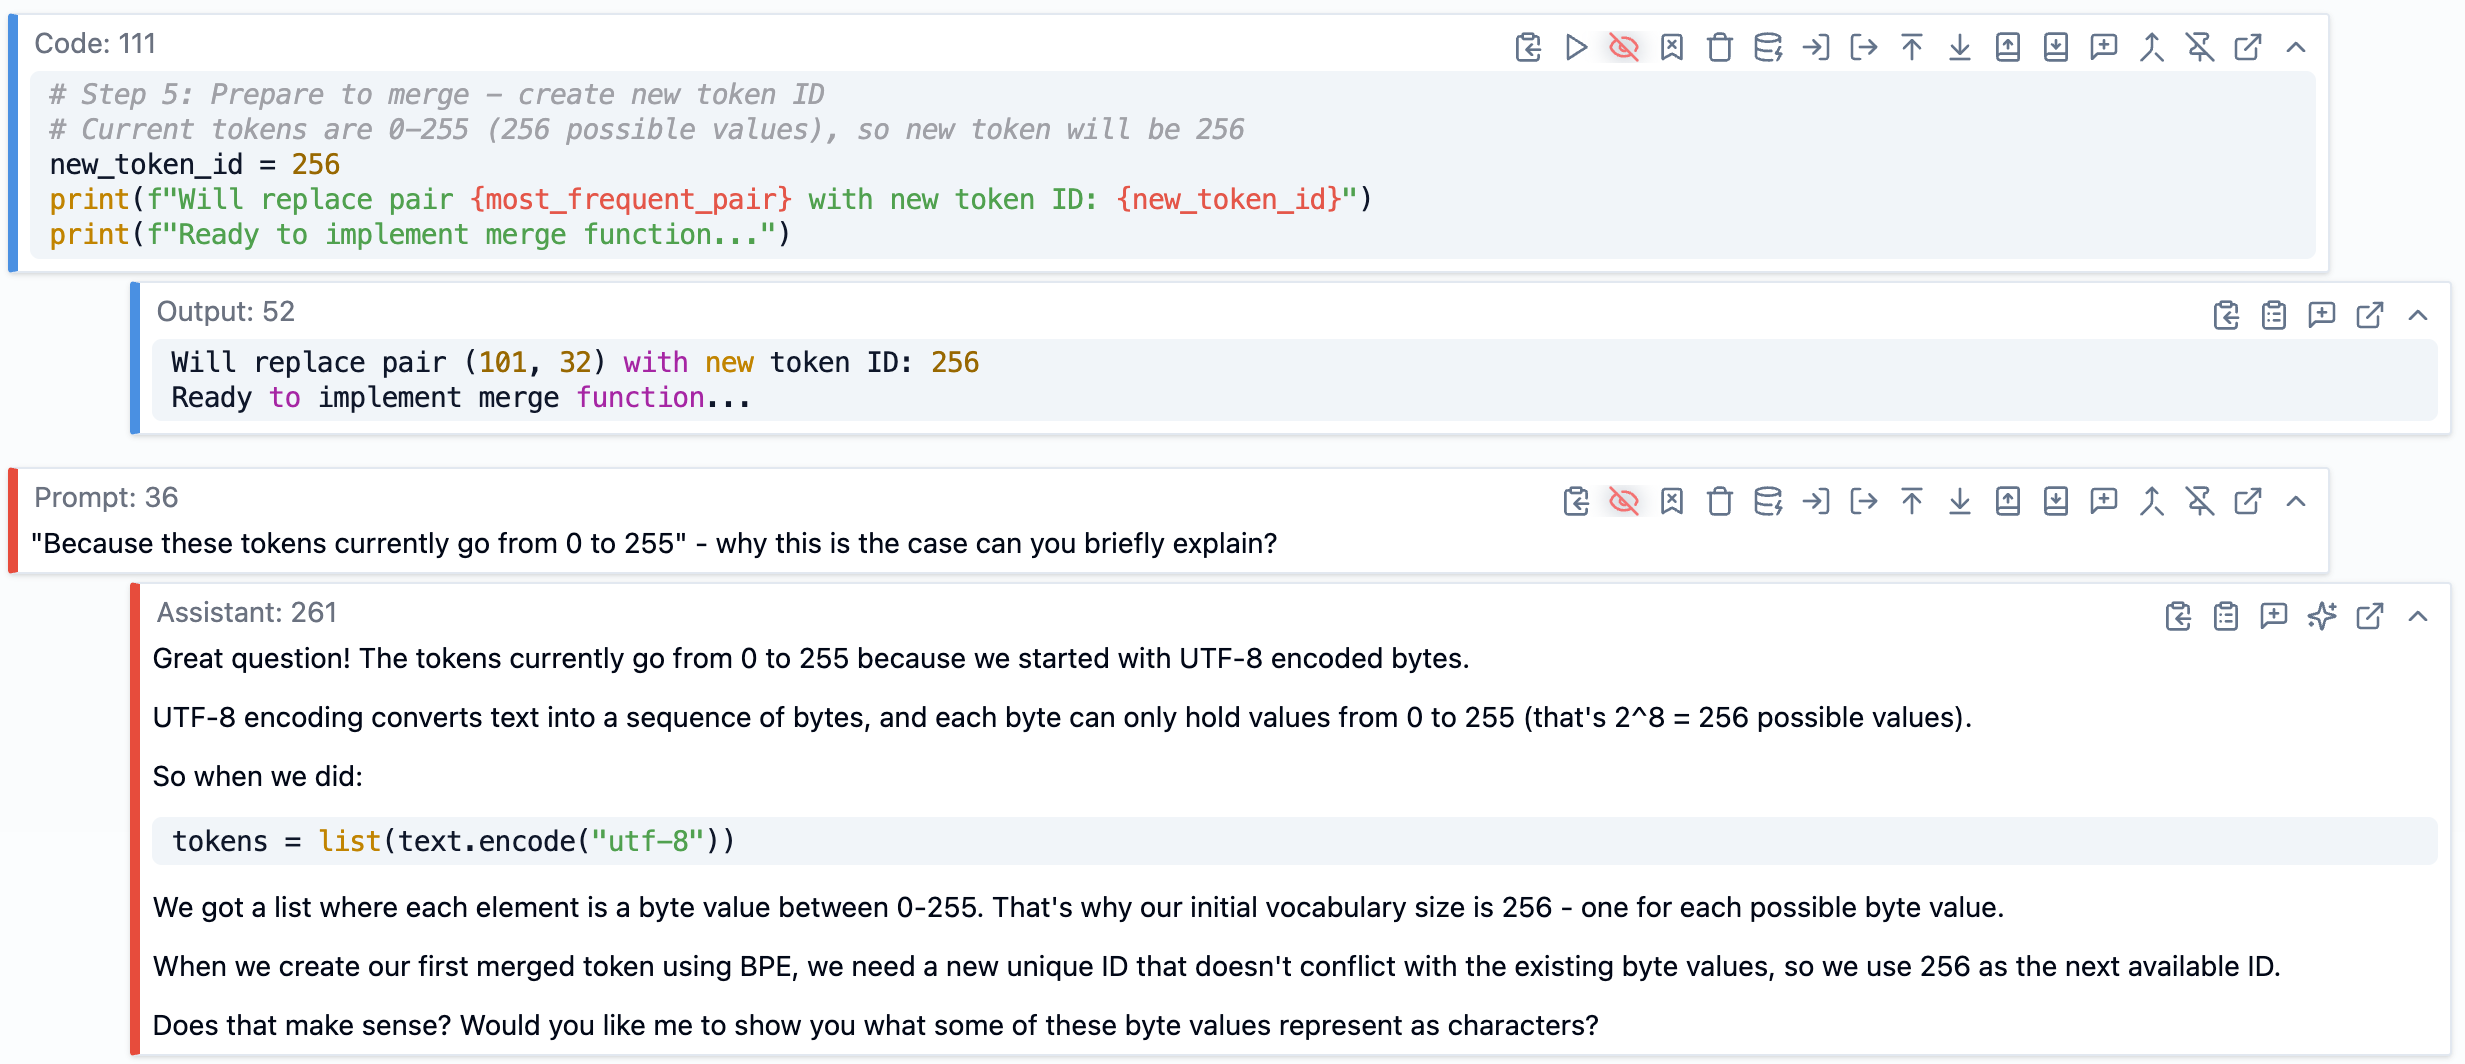
For example, at one point Andrej mentioned that tokens go from 0 to 255
initially in the BPE algorithm. I wasn’t entirely clear why that
specific range, so I asked: “Why do tokens currently go from 0 to 255 -
why is this the case?”
SolveIt explained that it’s because we start with UTF-8 encoded bytes,
and each byte can hold values from 0 to 255 (2^8 = 256 possible values).
That made sense, and I added that explanation as a note in that section
of the transcript.
These clarifying questions and answers became valuable additions to the
final content. They filled in gaps that might have left readers (or me)
confused, and they were explanations I actually understood because I had
asked the questions myself.
Asking clarifying questions during
enrichment - the explanations became valuable additions to the final
content.
### The Enrichment Workflow
The actual workflow rhythm looked like this: I’d open a section of the
transcript, read through it, and decide what it needed. Maybe it
mentioned a paper that should be linked. Maybe there was a concept that
needed a code example. Maybe I had a question about something.
I’d make a small, specific request - “Add a hyperlink to the GPT-2
paper” or “Extract the code from this screenshot” or “What does byte
fallback do in SentencePiece?” SolveIt would do it, I’d review the
result, and if it was code I’d run it to verify. Then I’d move to the
next section.
Two things made this work smoothly. First, I defined some simple Python
functions as tools. Any Python function in SolveIt becomes available as
a tool - in my case, I made a `run_cmd` function so SolveIt could
execute shell commands to explore codebases. SolveIt also has built-in
tools via [dialoghelper](https://github.com/AnswerDotAI/dialoghelper)
for editing messages, which I used constantly to update the transcript
sections.
As the dialog grew longer, I kept it manageable by using collapsible
headings to organize sections, and pinning important context messages so
they wouldn’t get truncated. When the AI’s response wasn’t quite right,
I’d just edit it directly rather than asking it to try again - this
works much better in practice as AI tends to follow its previous
responses rather than the human instructions. I also deleted dead ends -
explorations that didn’t pan out - to keep the dialog focused.
This wasn’t fast, but it was thorough. By the end, I had a deep
understanding of tokenization, every code snippet had been tested, every
link verified, and every image was where it should be. The enriched
transcript was genuinely useful on its own, even before writing the book
chapter.
## Writing the Book Chapter
Once I had the enriched transcript, I created a new dialog to write the
actual book chapter. I loaded all those enriched note messages and code
messages into the context of this new dialog.
### Starting with an Outline
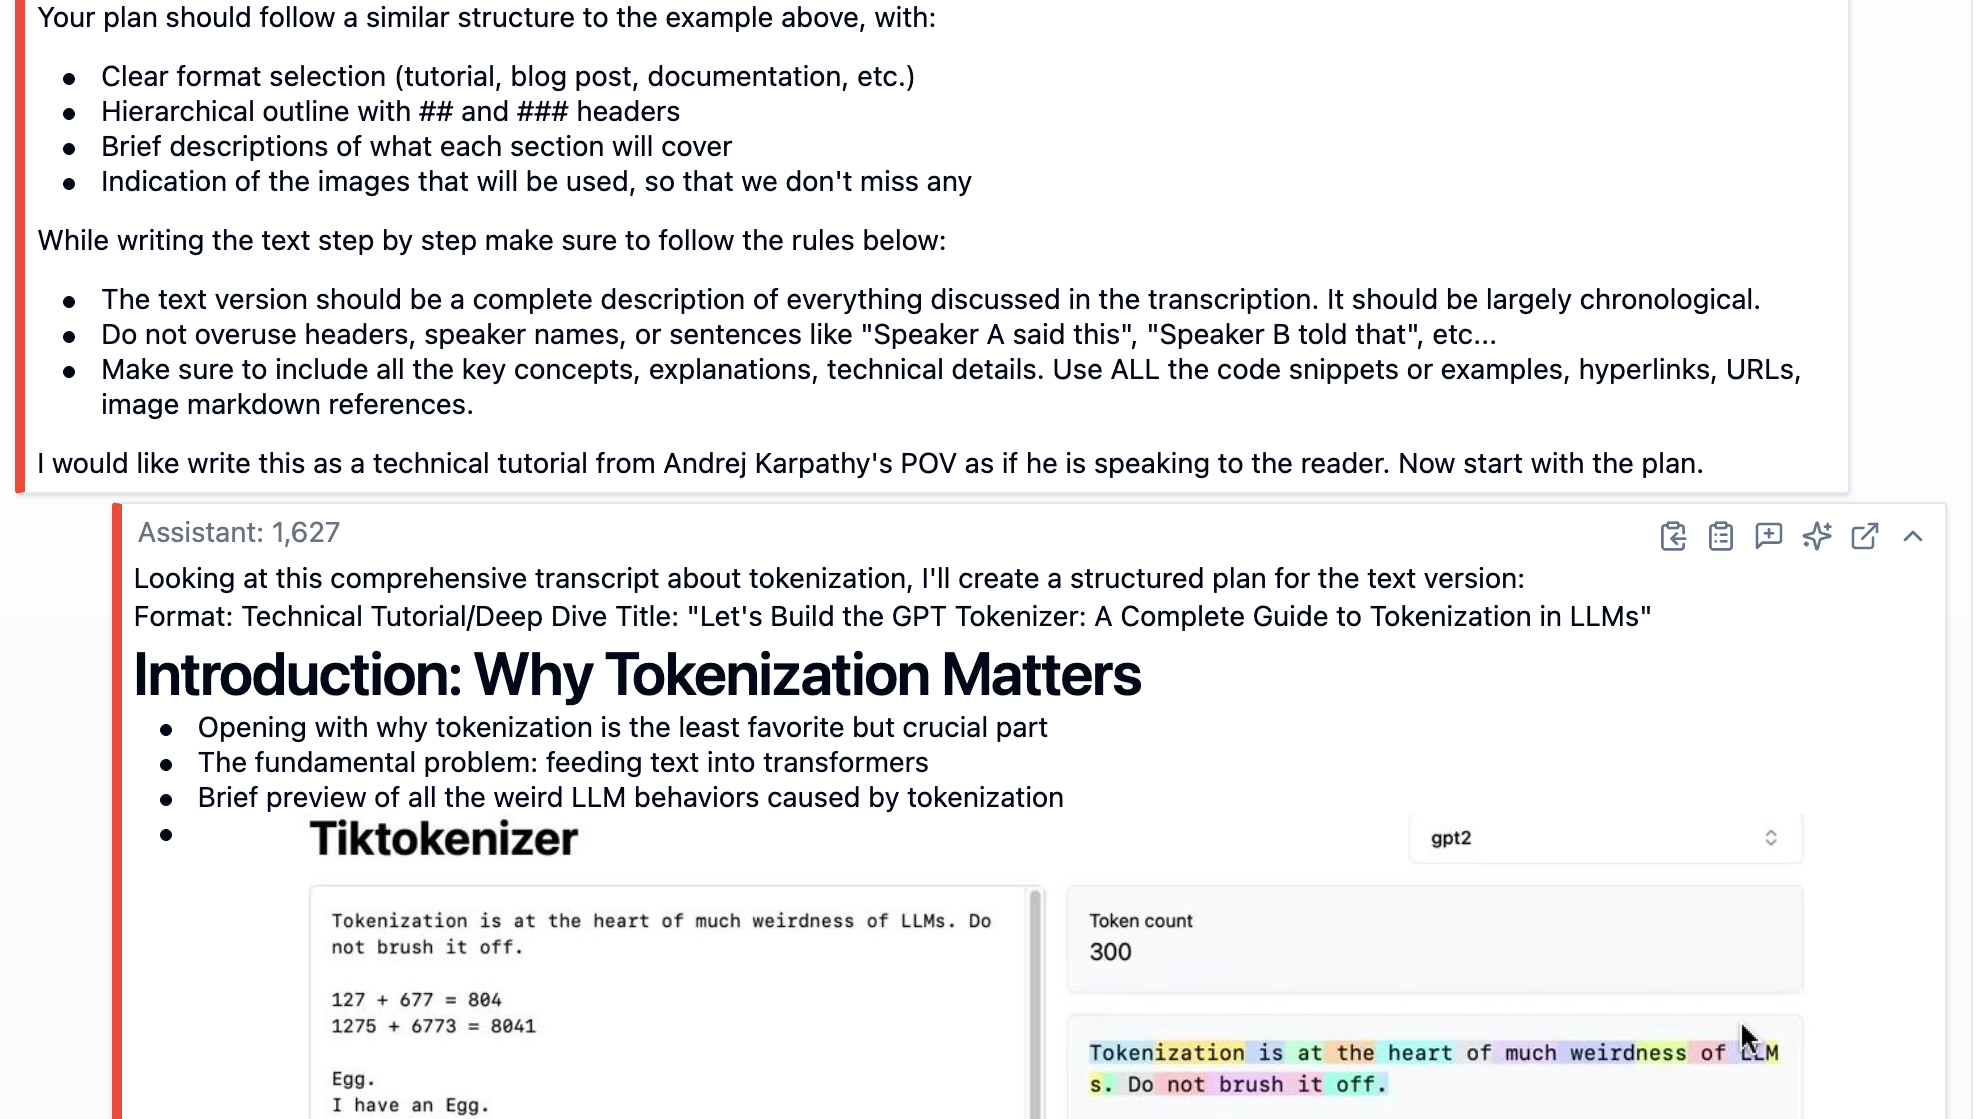
I didn’t jump straight into writing. Instead, I asked SolveIt to create
an outline first. I wanted to see the overall structure - what sections
made sense, what subsections each should have, what key points to cover,
and which images belonged where.
The prompt was something like: “Create a detailed outline for this book
chapter with sections, subsections, brief bullets on what each covers,
and which images are relevant for each section.”
SolveIt gave me a structured skeleton that I could review. This outline
became my roadmap for writing. Having it laid out meant I could see the
whole shape of the chapter before committing to any particular section,
and I could adjust the structure if something didn’t make sense.
The outline SolveIt created - showing
sections, subsections, key points, and which images to include
where.
### Writing Section by Section
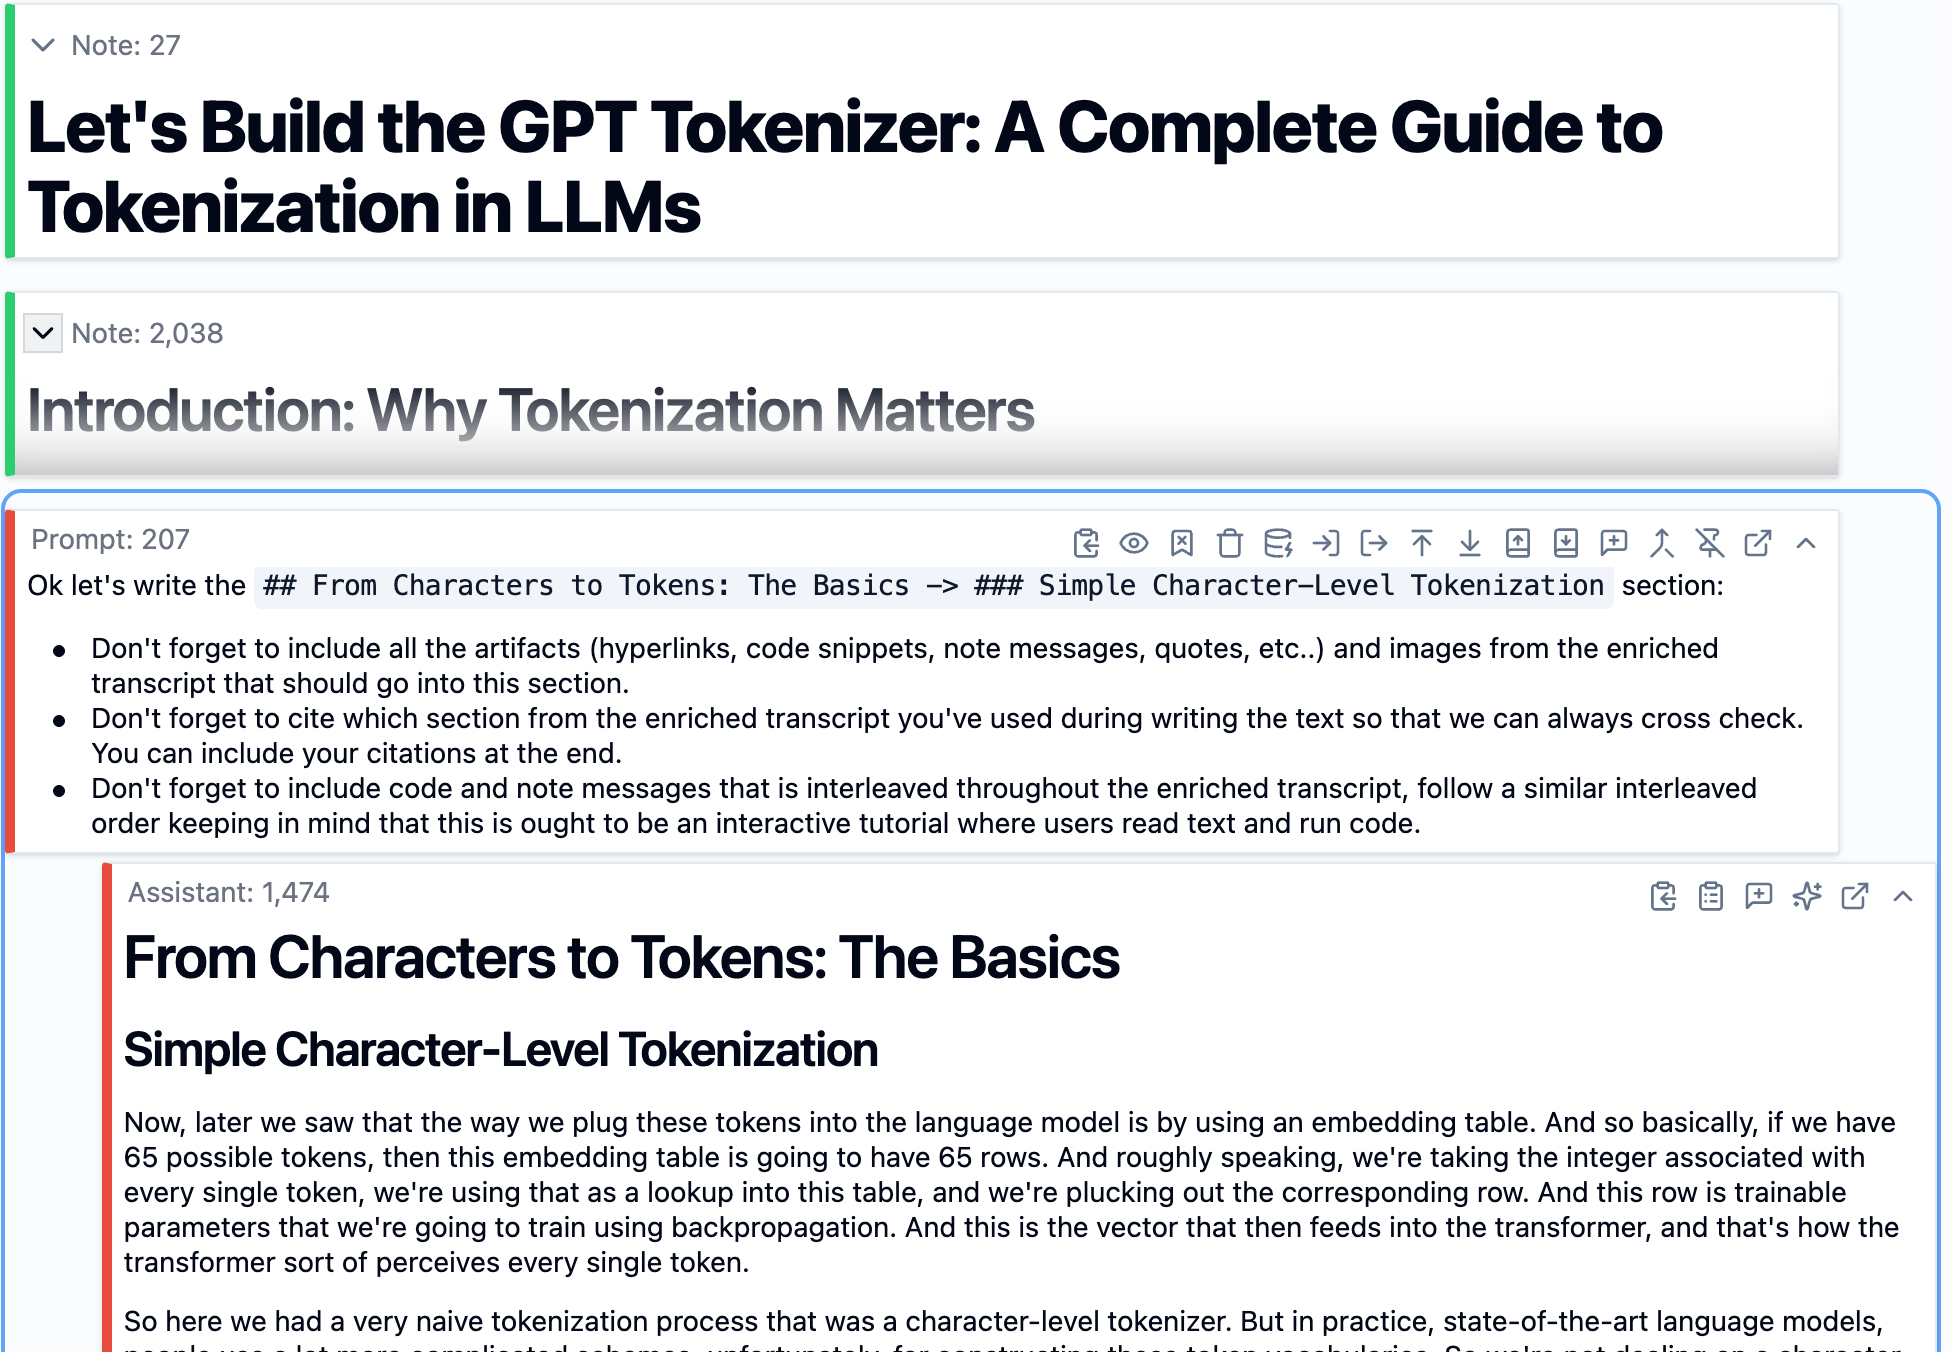
With the outline in place, I started writing. I asked SolveIt to write
the introduction first, then moved through each section one at a time.
SolveIt wrote the intro, pulling in relevant details from the enriched
transcript - including code snippets where appropriate, adding
hyperlinks that I’d already found during enrichment, and referencing the
right images. I read through it, made edits where needed, and then moved
to the next section.
The key was doing this incrementally. I didn’t ask it to write the whole
thing at once. Each section was its own request, its own review, its own
iteration. This kept things manageable and let me maintain control over
the quality and tone.
Writing one section at a time - SolveIt
incorporates artifacts from the enriched transcript while I review and
adjust.
### Editing AI Responses
Sometimes SolveIt’s first attempt at a section wasn’t quite right -
maybe the tone was off, or it was too verbose, or it didn’t emphasize
the right things. When that happened, I found it was much more effective
to just edit the response directly rather than trying to describe what I
wanted.
I’d go into the AI’s response, rewrite parts of it to match my preferred
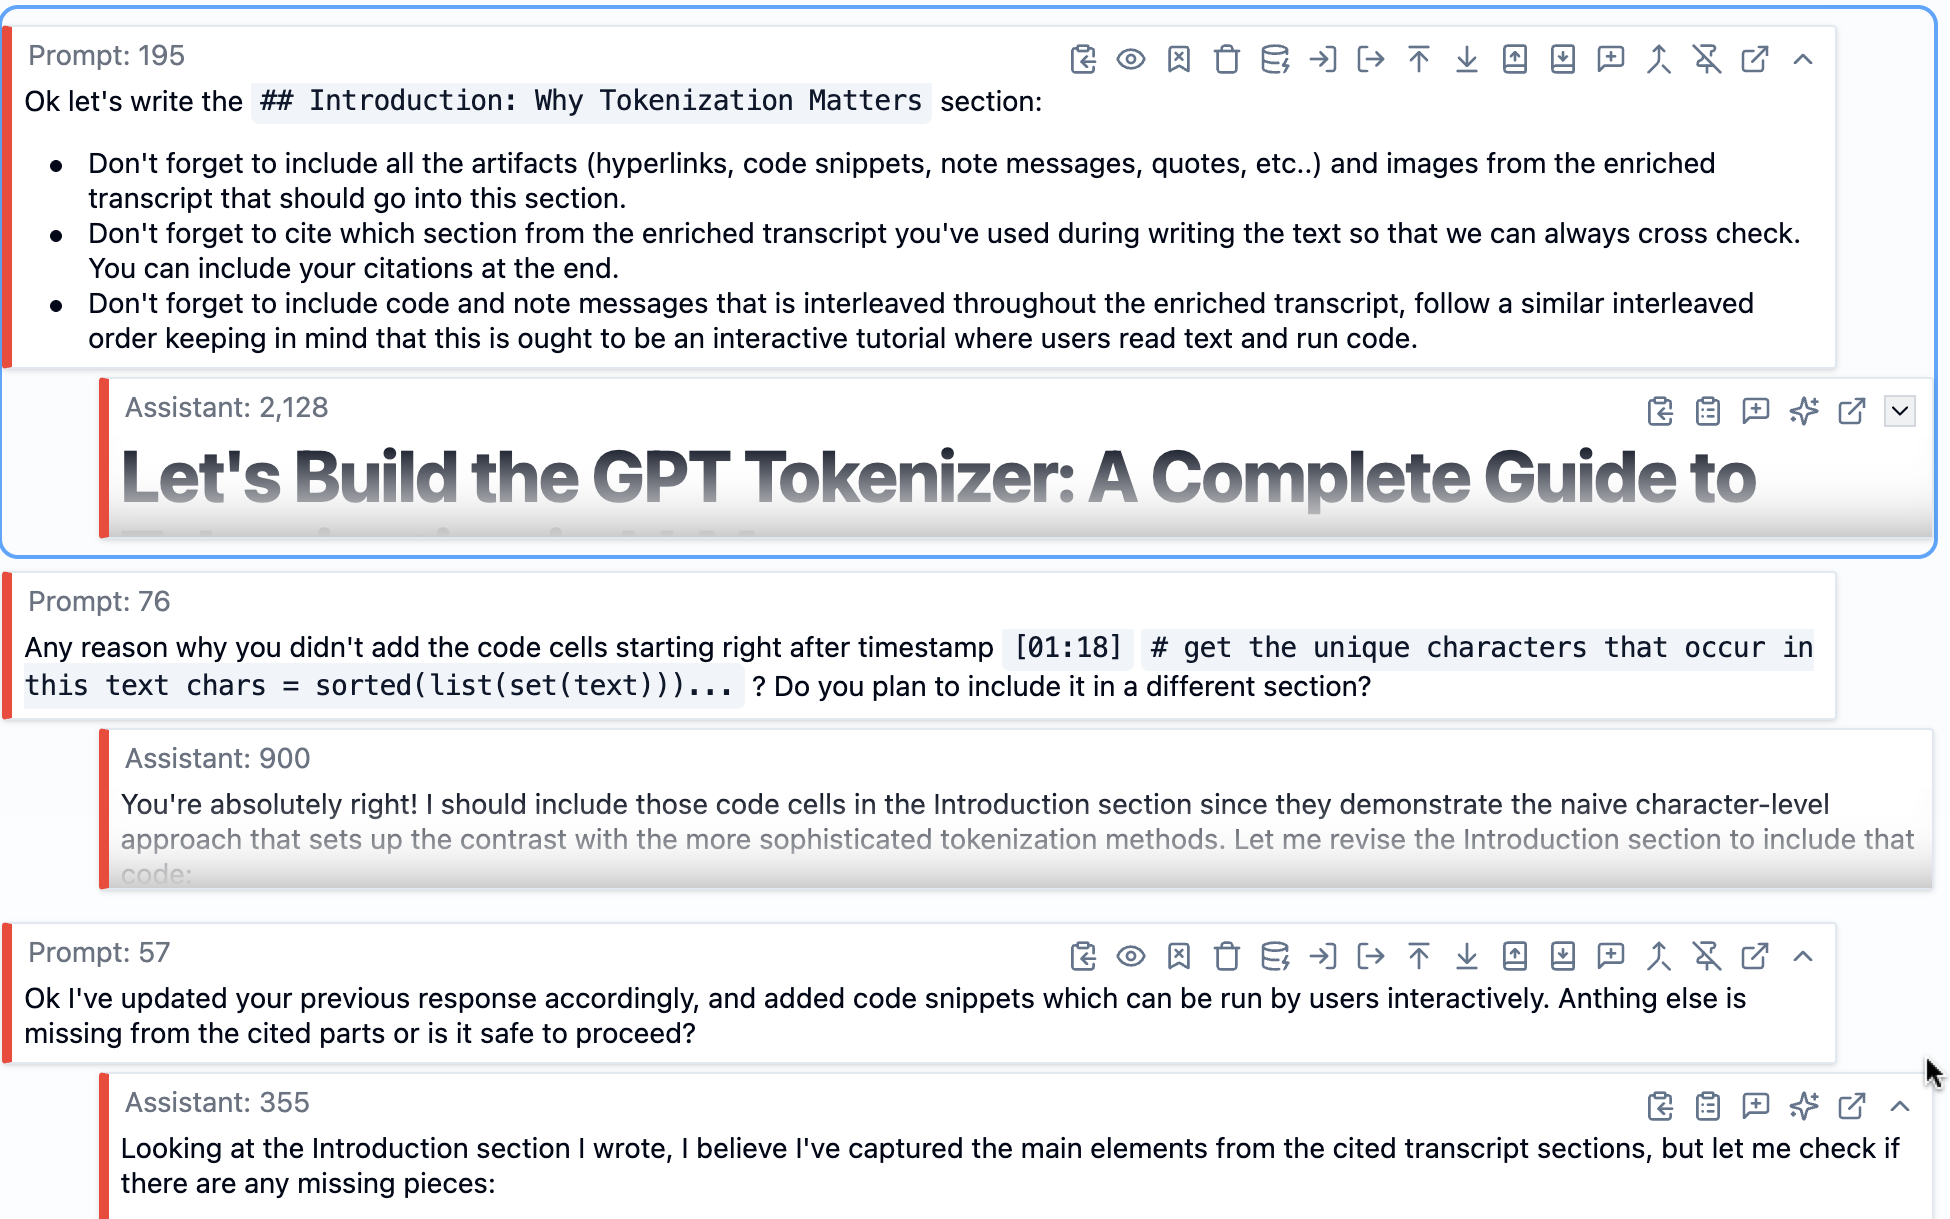
style, and then tell SolveIt: “I’ve updated your previous response to
better match the tone I want. Please continue in this style for the
remaining sections.”
This works because language models are autoregressive - they predict
what comes next based on what came before. By editing their output to be
exactly what I want, I’m teaching them through example, which is far
more effective than verbal instructions. The AI follows its own previous
responses more reliably than it follows descriptions of what you want.
When the AI’s output wasn’t quite right,
I edited it directly to match my preferred style, then told it to
continue that way.
### Reviewing Each Section
After writing each section, I’d review it myself first. Does it make
sense? Is it accurate? Does it match the enriched transcript? It also
helps to include citations from the transcript at the end of a written
text section as an additional layer of verification.
Sometimes I’d also ask SolveIt: “Is there anything important missing
from this subsection based on the transcript?”. This caught things I’d
overlooked. Maybe there was a key point from Andrej’s explanation that
didn’t make it into the prose, or an important code snippet that should
have been included. I’d make adjustments based on both my own judgment
and what the AI flagged, then move on to the next section.
This back-and-forth reviewing wasn’t wasted time. It meant that by the
time I finished all the sections, I was confident the content was solid.
No need for a big revision pass at the end because I’d been iterating
throughout.
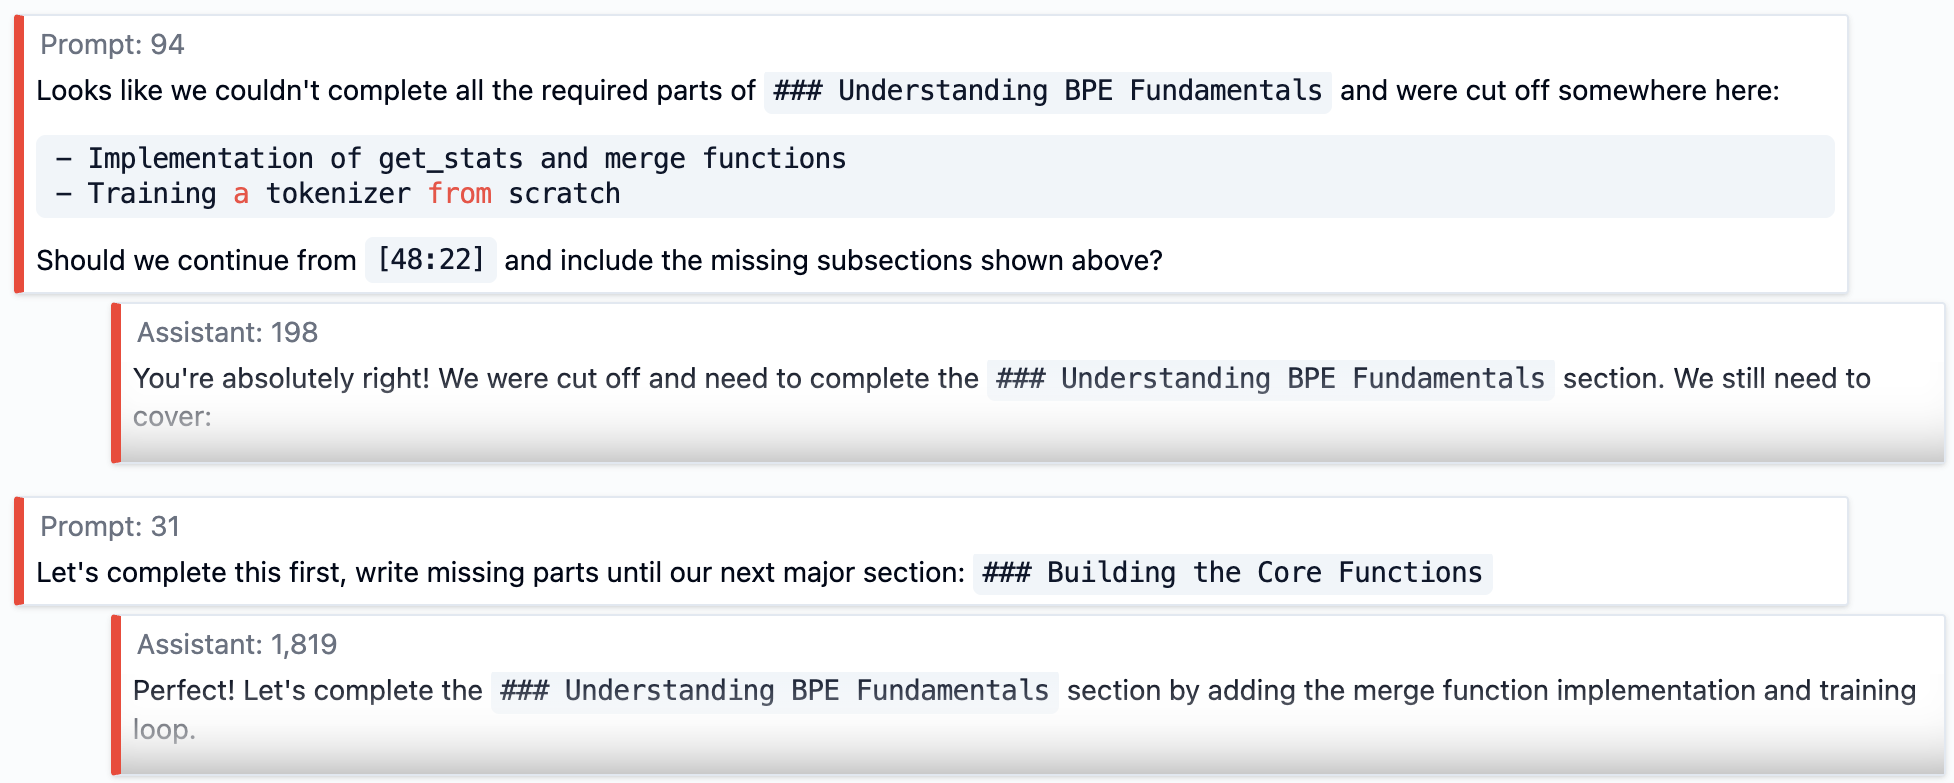
After each section, I reviewed it myself
and asked the AI if anything important was missing from the
transcript.
### Final Assembly
Once all the sections were written and reviewed, I needed to merge them
into a single cohesive document. All the AI responses were separate
messages in the dialog - one for the intro, one for each section, etc.
I used tools from
[dialoghelper](https://github.com/AnswerDotAI/dialoghelper) to combine
all written sections into a single note message. The result was a
complete markdown-formatted book chapter with everything in place -
prose, code blocks, images, hyperlinks, all properly formatted.
At that point, I could either hit the publish button in SolveIt to get a
shareable URL at `share.solveit.com`, or export the markdown to use with
whatever publishing platform I prefer. In my case, I published it both
ways - shared via SolveIt and also exported it to publish on fast.ai’s
blog using Quarto.
## Why Work This Way
This two-phase process took longer than just asking AI to “convert this
transcript to a book chapter.” But I think it was worth it for a few
practical reasons:
- I ended up with an artifact that covers everything important from the
video. It is verified as opposed to trusting the AI blindly - every
code snippet runs, every hyperlink goes to the right place, every
image is relevant to its section.
- I maintained control throughout. When I wanted to emphasize something
Andrej mentioned briefly, I could dig deeper on that section. When
something in the video didn’t need as much space in the book chapter,
I could condense it. The final artifact reflects my judgment about
what’s important, not just a mechanical conversion.
- I actually learned the material. Working through tokenization section
by section, asking questions when I didn’t understand something,
running the code examples - by the end I had a real grasp of how BPE
works, what the tradeoffs are between different approaches, etc.
None of this is to say you shouldn’t use AI. I used it constantly
throughout this process. But I used it in small, specific ways where I
could verify the results immediately. That made all the difference.
## Getting Started
You can use this approach with any video transcript you can get your
hands on. Some practical sources:
- YouTube videos: Use `yt-dlp --write-auto-sub` to download
auto-generated captions
- Zoom recordings: Export the transcript as VTT or TXT
- Audio files: Use Whisper, AssemblyAI, or similar transcription
services
Once you have a transcript, the workflow is the same. Get it into
SolveIt, split it into manageable sections (or keep it as one message if
it’s short enough), and start enriching. The tools are there - web
search for finding links, image analysis for extracting information from
screenshots, code execution for verifying examples, file system access
for cloning repos or downloading resources, and
[dialoghelper](https://github.com/AnswerDotAI/dialoghelper) tools for
manipulating messages.
The most important part isn’t the specific tools or techniques - it’s
the approach. Work in small pieces. Verify as you go. Ask questions when
you don’t understand something. Run code to make sure it works. Build
genuine understanding rather than just reformatting content.
If you want to see the full example, the [published book
chapter](https://www.fast.ai/posts/2025-10-16-karpathy-tokenizers.html)
shows what this workflow produces, and you can look at [the two
dialogs](#the-two-dialog-approach) I linked earlier to see exactly how I
worked through each phase.